关于自动微分机制的数学证明放在文末,首先给出自动微分的程序实现。因为是我笔算进行推导的,可能存在谬误。
Python version: 3.12.4
numpy version: 1.26.4
sklearn version: 1.3.0
计算图定义
计算图(computational graph)是一种被用于pytorch与tensorflow中进行自动微分以实现误差的反向传播、进而计算各参数梯度的技术,这使得我们可以方便地使用梯度更新神经网络的参数。其中,pytorch使用动态计算图设计,tensorflow使用静态计算图设计。
我们的实现中,计算图与自动微分系统被“嵌入”在了层的定义。pytorch在源码中定义了计算图基类,通过重载运算符等方法实现计算图的生成。
 1import numpy as np
 2from sklearn.datasets import make_moons
 3
 4
 5class Linear:
 6    def __init__(self, inputFeatures, outputFeatures, bias=True):
 7        self.weights = np.random.rand(inputFeatures, outputFeatures)
 8        self.bias = np.random.rand(outputFeatures)
 9
10    def __call__(self, x):
11        self.input = x
12        self.output = x @ self.weights
13        if self.bias is not False:
14            self.output += self.bias
15        return self.output
16
17    def paramenters(self):
18        if self.bias is not False:
19            return [self.output, self.bias]
20        return [self.output]
21
22    def backward(self, grad_output, learning_rate):
23        grad_input = grad_output @ self.weights.T
24        grad_weights = self.input.T @ grad_output
25        grad_bias = np.sum(grad_output, axis=0) if self.bias is not None else None
26
27        self.weights -= learning_rate * grad_weights
28        if self.bias is not None:
29            self.bias -= learning_rate * grad_bias
30
31        return grad_input
32
33
34class Sigmoid:
35    def __call__(self, x):
36        self.output = 1 / (1 + np.exp(-x))
37        return self.output
38
39    def backward(self, grad_output, learning_rate):
40        grad_input = grad_output * self.output * (1 - self.output)
41        return grad_input
42
43
44class Softmax:
45    def __call__(self, x):
46        self.output = np.exp(x - np.max(x, axis=1, keepdims=True))
47        self.output /= np.sum(self.output, axis=1, keepdims=True)
48        return self.output
49
50    # def backward(self, grad_output, learning_rate):
51    #     grad_input = grad_output.copy()
52    #     batch_size = grad_output.shape[0]
53
54    #     for i in range(batch_size):
55    #         y = self.output[i][:, None]
56    #         jacobian = np.diag(y) - np.outer(y, y)
57    #         grad_input[i] = jacobian @ grad_output[i]
58
59    #     return grad_input
60
61
62class Sequential:
63    def __init__(self, layers):
64        self.layers = layers
65
66    def __call__(self, x):
67        for layer in self.layers:
68            x = layer(x)
69        self.output = x
70        return self.output
71
72    def predict_proba(self, x):
73        logits = self(x)
74        e_x = np.exp(logits - np.max(logits))
75        return e_x / e_x.sum(axis=0, keepdims=True)
76
77    def paramenters(self):
78        return [p for layer in self.layers for p in layer.paramenters()]
基于计算图的MLP定义
 1class MLP:
 2    def __init__(self):
 3        self.model = Sequential([
 4            Linear(2, 4), Sigmoid(),
 5            Linear(4, 4), Sigmoid(),
 6            Linear(4, 2)
 7        ])
 8        self.softmax = Softmax()
 9
10    def __call__(self, x):
11        return self.model(x)
12
13    def forward(self, x):
14        return self.model(x)
15
16    def backwardAndGradientDescent(self, x, y, learning_rate):
17        '''
18        x: input darta vector, like [[0.5, -1.2], [0.7, 0.3], [-0.2, 0.8]]
19        y: labels vector, like [0, 1, 0]
20        '''
21        batch_size = x.shape[0]
22        logits = self.forward(x)
23
24        grad_output = logits.copy()
25        grad_output[range(batch_size), y] -= 1  # cross entropy gradient
26        grad_output /= batch_size
27
28        for layer in reversed(self.model.layers):
29            grad_output = layer.backward(grad_output, learning_rate)
30
31    def probability(self, x):
32        '''
33        x: input darta vector, like [[0.5, -1.2], [0.7, 0.3], [-0.2, 0.8]]
34        return: probability vector, like [[0.88, 0.12], [0.45, 0.55],  [0.31, 0.69]]
35        '''
36        batch_size = x.shape[0]
37        logits = self.forward(x)
38        return self.softmax(logits)
39
40    def classify(self, x):
41        return np.argmax(self.probability(x), axis=1)
训练过程
 1X, y = make_moons(n_samples=1000, noise=0.1)
 2batch_size= 50
 3max_steps = 50000
 4learning_rate = 0.05
 5mlp = MLP()
 6lossRecord = []
 7
 8for step in range(max_steps):
 9    indices = np.arange(X.shape[0])
10    np.random.shuffle(indices)
11    X, y = X[indices], y[indices]
12
13    for i in range(0, X.shape[0], batch_size):
14        X_batch = X[i:i+batch_size]
15        y_batch = y[i:i+batch_size]
16        mlp.backwardAndGradientDescent(X_batch, y_batch, learning_rate)
17
18    if step % 10000 == 0:
19        output_batch = mlp.forward(X_batch)
20        epsilon = 1e-12
21        loss = -np.mean(np.log(output_batch[range(batch_size), y_batch] + epsilon))
22        lossRecord.append(loss)
23        print(f"Step {step}, Loss: {loss}")
打印:
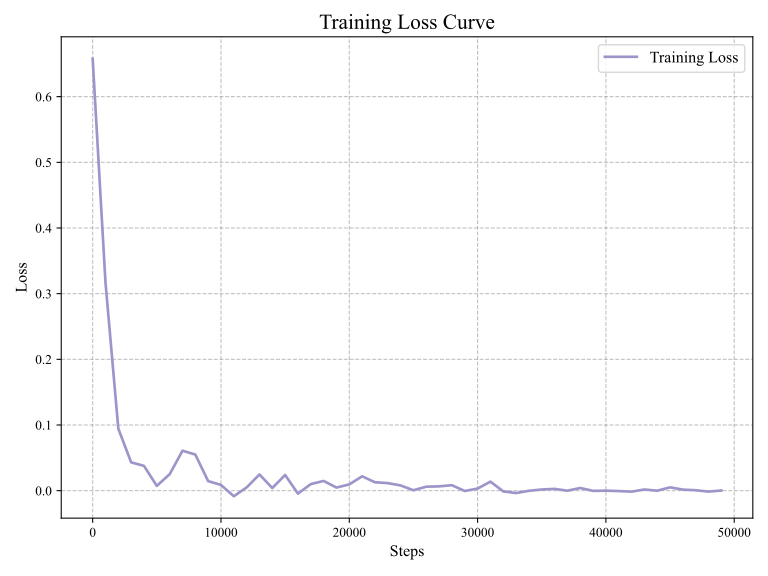
Step 0, Loss: 0.6577937985199145
Step 10000, Loss: 0.00873273601484354
Step 20000, Loss: 0.00953517332872011
Step 30000, Loss: 0.0031810759662180698
Step 40000, Loss: 2.1824599140328784e-05
Step 50000, Loss: 0.00025276002897095404
 1import matplotlib.pyplot as plt
 2
 3steps = np.arange(0, max_steps, 1000)
 4plt.rcParams.update({'font.family': 'serif', 'font.serif': ['Times New Roman'], 'axes.titlesize': 14, 'axes.labelsize': 12, 'xtick.labelsize': 10, 'ytick.labelsize': 10, 'lines.linewidth': 2, 'lines.markersize': 5, 'figure.figsize': (8, 6), 'axes.grid': True, 'grid.alpha': 0.5, 'grid.linestyle': '--', 'grid.color': 'gray'})
 5plt.plot(steps, lossRecord, color='#9b95c9', label='Training Loss')
 6plt.title('Training Loss Curve', fontsize=16)
 7plt.xlabel('Steps', fontsize=12)
 8plt.ylabel('Loss', fontsize=12)
 9plt.legend(loc='upper right', fontsize=12)
10plt.xticks(fontsize=10)
11plt.yticks(fontsize=10)
12plt.tight_layout()
13# plt.savefig("training_loss_curve.svg", format="svg")
14plt.show()
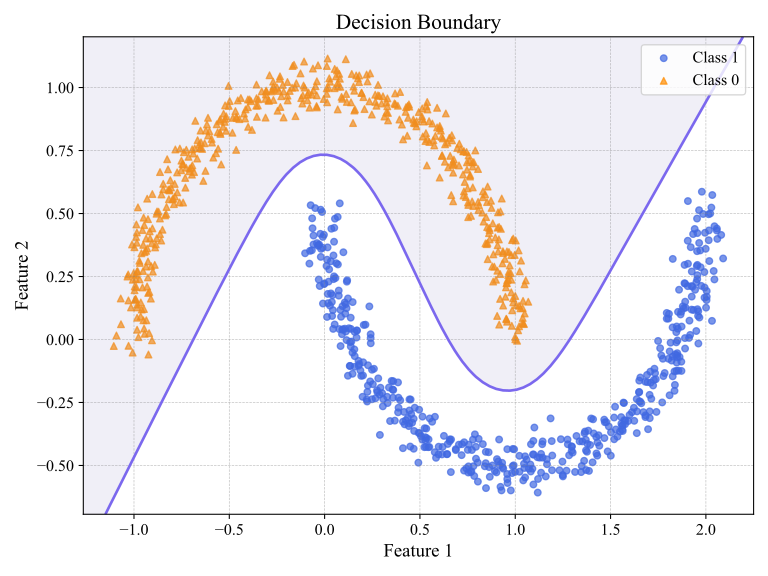
超平面可视化
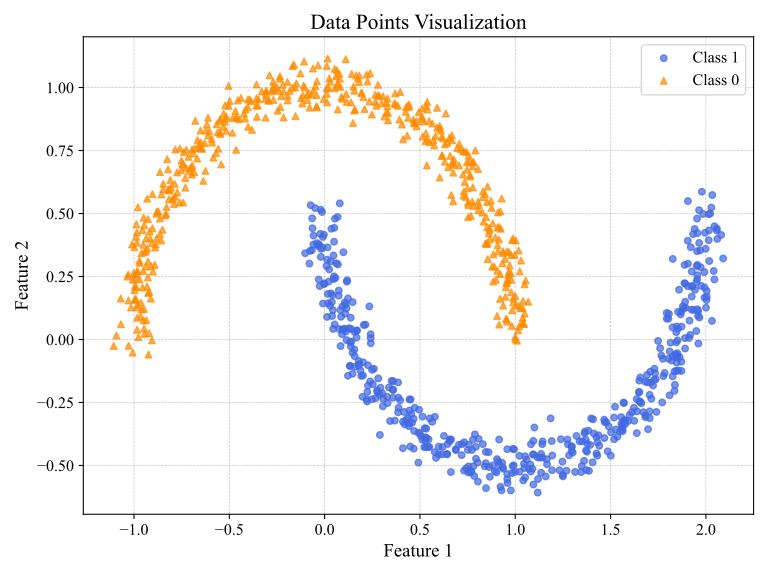
可视化的原始代码来自唐亘先生的GitHub项目,在他的视频徒手实现多层感知器–人工智能的创世纪中对此有作演示。在他的可视化代码基础上,我做了若干更改,使数据图漂亮不少——至少,从我审美看的话。
 1def draw_data(data):
 2    '''
 3    将数据可视化
 4    '''
 5    fig = plt.figure(figsize=(8, 6))
 6    ax = fig.add_subplot(1, 1, 1)
 7    x, y = data
 8    label1 = x[y > 0]
 9    ax.scatter(label1[:, 0], label1[:, 1], marker='o', color='royalblue', label='Class 1', alpha=0.7)
10    label0 = x[y == 0]
11    ax.scatter(label0[:, 0], label0[:, 1], marker='^', color='darkorange', label='Class 0', alpha=0.7)
12    ax.set_title('Data Points Visualization', fontsize=16)
13    ax.set_xlabel('Feature 1', fontsize=14)
14    ax.set_ylabel('Feature 2', fontsize=14)
15    ax.tick_params(axis='both', which='major', labelsize=12)
16    ax.legend(loc='upper right', fontsize=12)
17    ax.grid(True, linestyle='--', linewidth=0.5, alpha=0.5)
18    return ax
19
20def draw_model(ax, model):
21    '''
22    将模型的分离超平面可视化
23    '''
24    x1 = np.linspace(ax.get_xlim()[0], ax.get_xlim()[1], 100)
25    x2 = np.linspace(ax.get_ylim()[0], ax.get_ylim()[1], 100)
26    x1, x2 = np.meshgrid(x1, x2)
27    y = model.probability(np.c_[x1.ravel(), x2.ravel()])[:, 1]
28    y = y.reshape(x1.shape)
29    contour = ax.contourf(x1, x2, y, levels=[0, 0.5], colors=['#9B95C9'], alpha=0.15)
30    ax.contour(x1, x2, y, levels=[0.5], colors='#7B68EE', linewidths=2, linestyles='solid')
31    ax.set_title('Decision Boundary', fontsize=16)
32    ax.set_xlabel('Feature 1', fontsize=14)
33    ax.set_ylabel('Feature 2', fontsize=14)
34    ax.tick_params(axis='both', which='major', labelsize=12)
35    ax.grid(True, linestyle='--', linewidth=0.5, alpha=0.5)
36    return ax
1draw_data([X, y])
2plt.tight_layout()
3# plt.savefig("data_distribution.svg", format="svg")
4plt.show()
1draw_model(draw_data([X, y]), mlp)
2plt.tight_layout()
3# plt.savefig("hyperplane.svg", format="svg")
4plt.show()
自动微分机制的数学证明
在一个MLP中,假设batch_size = 1,以分子布局表示向量微分,记 $\boldsymbol{z}\in\mathbb{R}^{1\times n}$、$\boldsymbol{z}',\boldsymbol{b}\in\mathbb{R}^{1\times m}$、$\boldsymbol{W}\in\mathbb{R}^{n\times m}$,
也可以写成标量形式,即
$$ z'_i=\sigma\Big(\sum^n_{j=1}w_{ji}z_j+b_i\Big),\ \ \ \ i=1,2\cdots,m\tag{2} $$设中间变量 $\boldsymbol{a}=\boldsymbol{Wz}+\boldsymbol{b}$,$\boldsymbol{a}\in\mathbb{R}^{1\times m}$,$\boldsymbol{a}$ 表示数据经线性变换后、经非线性映射(激活函数)前的内容,有公式 $\boldsymbol{z}'=\sigma(\boldsymbol{a})$,与
$$ a_i=\sum^n_{j=1}w_{ji}z_j+b_i,\ \ \ \ i=1,2\cdots,m\tag{3} $$根据链式法则,当梯度传播至 $\boldsymbol{z}'$,即已知 $\frac{\partial\mathcal{L}}{\partial\boldsymbol{z}'}\big|_{\boldsymbol{\theta}}$,其中 $\mathcal{L}$ 为损失函数,则
$$ \frac{\partial\mathcal{L}}{\partial a_i}=\frac{\partial\mathcal{L}}{\partial\boldsymbol{z}'_i}\frac{\partial{z'_i}}{\partial{a_i}},\ \ \ \ i=1,2\cdots,m\tag{4} $$写作向量形式,即
$$ \boxed{\frac{\partial\mathcal{L}}{\partial\boldsymbol{a}}=\frac{\partial\mathcal{L}}{\partial\boldsymbol{z}'}\frac{\partial\boldsymbol{z}'}{\partial\boldsymbol{a}}=\frac{\partial\mathcal{L}}{\partial\boldsymbol{z}'}\odot\,\textbf{grad}\big(\sigma(\boldsymbol{a})\big)=\frac{\partial\mathcal{L}}{\partial\boldsymbol{z}'}\odot\sigma'(\boldsymbol{a})}\tag{5} $$所以激活函数$\sigma$在反向传播时,应将 $\frac{\partial\mathcal{L}}{\partial\boldsymbol{a}}$ 传播至低一层。对于不含参数的激活函数,并不需要进行参数的更新,其任务只是传递梯度 $\frac{\partial\mathcal{L}}{\partial\boldsymbol{a}}$。其中$\odot$表示Hadamard积,在numpy中对应操作符 *。
现在逐个讨论 $\frac{\partial\mathcal{L}}{\partial\boldsymbol{W}}$、$\frac{\partial\mathcal{L}}{\partial\boldsymbol{b}}$ 与 $\frac{\partial\mathcal{L}}{\partial\boldsymbol{z}}$。对于$\frac{\partial\mathcal{L}}{\partial\boldsymbol{W}}$,$i,j\in[1,m]\times[1,n]$,有
$$ \frac{\partial\mathcal{L}}{\partial w_{ji}}=\sum^m_{k=1}\frac{\partial\mathcal{L}}{\partial a_k}\frac{\partial a_k}{\partial w_{ji}}=\sum^m_{k=1}\frac{\partial\mathcal{L}}{\partial a_k}\frac{\partial}{\partial w_{ji}}\left(\sum^n_{l=1}w_{lk}\,z_l+b_k\right)=\frac{\partial\mathcal{L}}{\partial a_i}\cdot z_j\tag{6} $$所以
$$ \boxed{\begin{aligned}\\&\ \ \ \ \frac{\partial\mathcal{L}}{\partial\boldsymbol{W}}=\left(\begin{matrix}z_1\frac{\partial\mathcal{L}}{\partial a_1}&z_2\frac{\partial\mathcal{L}}{\partial a_1}&\cdots&z_n\frac{\partial\mathcal{L}}{\partial a_1}\\z_1\frac{\partial\mathcal{L}}{\partial a_2}&z_2\frac{\partial\mathcal{L}}{\partial a_2}&\cdots&z_n\frac{\partial\mathcal{L}}{\partial a_2}\\\vdots&\vdots&&\vdots\\z_1\frac{\partial\mathcal{L}}{\partial a_m}&z_2\frac{\partial\mathcal{L}}{\partial a_m}&\cdots&z_n\frac{\partial\mathcal{L}}{\partial a_m}\\\end{matrix}\right)=\boldsymbol{z}^T\frac{\partial\mathcal{L}}{\partial\boldsymbol{a}}\ \ \ \ \\&\end{aligned}}\tag{7} $$接着讨论$\frac{\partial\mathcal{L}}{\partial\boldsymbol{b}}$,易见
$$ \frac{\partial\mathcal{L}}{\partial b_i}=\frac{\partial\mathcal{L}}{\partial a_i}\frac{\partial a_i}{\partial{b_i}}=\frac{\partial\mathcal{L}}{\partial a_i}\times1,\ \ \ \ i=1,2\cdots,m\tag{8} $$显然
$$ \boxed{\frac{\partial\mathcal{L}}{\partial\boldsymbol{b}}=\frac{\partial\mathcal{L}}{\partial\boldsymbol{a}}}\tag{9} $$当batch_size大于$1$时,$\frac{\partial\mathcal{L}}{\partial\boldsymbol{b}}$ 应取np.sum(grad_output, axis=0)而非grad_output。这一步对其他梯度计算而言已经蕴含在矩阵 / 张量乘法中了,但对偏置需要单独实现。
最后讨论 $\frac{\partial\mathcal{L}}{\partial\boldsymbol{z}}$,同理
$$ \begin{align*}\frac{\partial\mathcal{L}}{\partial z_i}&=\sum^m_{j=1}\frac{\partial\mathcal{L}}{\partial a_j}\frac{\partial a_j}{\partial z_i}\tag{10}\\&=\sum^m_{j=1}\frac{\partial\mathcal{L}}{\partial a_j}\frac{\partial}{\partial z_i}\left(\sum^n_{k=1}w_{kj}z_k+b_j\right)\tag{11}\\&=\sum^m_{j=1}w_{ij}\frac{\partial\mathcal{L}}{\partial a_j},\ \ \ \ i=1,2\cdots,n\tag{12}\end{align*} $$因此
$$ \boxed{\frac{\partial\mathcal{L}}{\partial\boldsymbol{z}}=\frac{\partial\mathcal{L}}{\partial\boldsymbol{a}}\boldsymbol{W}^T}\tag{13} $$其中$\frac{\partial\mathcal{L}}{\partial\boldsymbol{W}}$与$\frac{\partial\mathcal{L}}{\partial\boldsymbol{b}}$通过梯度下降及其变种算法参与参数更新,$\frac{\partial\mathcal{L}}{\partial\boldsymbol{z}}$则传递给低一层的网络或激活函数。如果要更新网络参数,前向传播时各层应保存输入,以便在反向传播时计算梯度。
代码中的反向传播算法实际上正是该推理的程序实现。
补充:关于批归一化技术与层归一化技术,偶然发现有一篇博客总结得十分不错,和我的见解高度一致,在此引用,